
MODEL INSTRUCTIONS
Hidden Wi-Fi Camera Pro instructions
Set up the Camera Pro in its matching app, check the live view, then add Wi-Fi for remote access. Follow the separate receiver section only when your selected kit includes one.
Before you start
| Control or state | What it does |
|---|---|
| Version choice | Camera Pro can have an integrated or external battery; the housing width differs. Use the power parts supplied for that option. |
| Viewing / recording | 4K local recording or internet Wi-Fi viewing; the guide lists a 90° view and mounting accessories. |
| Listed use time | About 4 hours, depending on use. |
| Listed camera kit | Camera Pro, two button kits, two fixing pieces and USB cable. The contents block lists a 5 V / 2 A charger, while the charging instructions specify a maximum 5 V / 1 A supply; ask support to resolve a differing supplied label before charging. |
| Optional router bundle | Router, 3000 mAh battery, NanoSIM-to-MicroSIM adapter and USB-C cable, only if selected. |
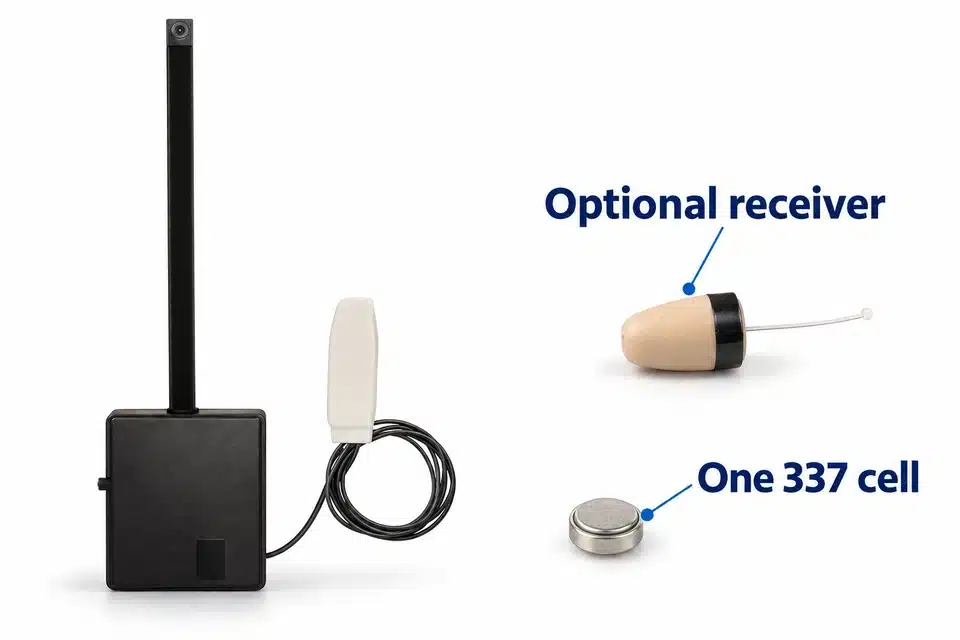
| Optional receiver bundle | Selected induction Vip receiver and two 337/SR416SW cells, only if selected. This path uses the Camera Pro white induction element. |
Check the chosen option and your order’s contents before using or replacing parts. Optional bundles are included only when selected.
Check local live view first, then remote viewing and audio. These are separate checks.
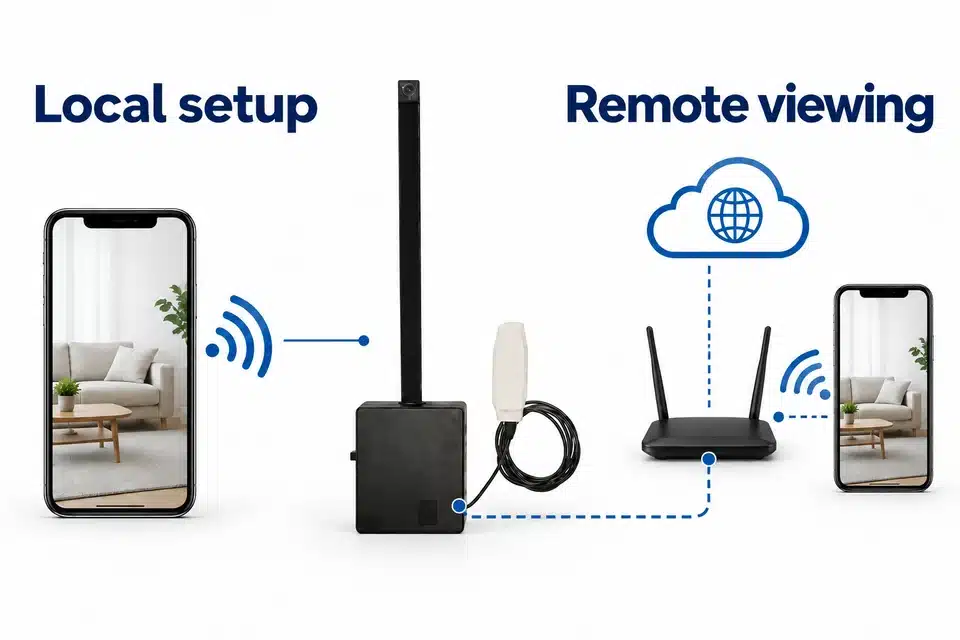
Camera Pro: setup and checks
1. Camera Pro: choose local recording or remote viewing
Do not kink the camera ribbon, bend it more than 90 degrees, pull it sharply or leave it dangling. Support the camera, not its cable.
Local mode records video and microphone audio to microSD while the camera is on. Remote mode uses an internet-connected router or phone hotspot; it does not require a microSD card.
2. Camera Pro: prepare local recording
- With the camera off, fit a microSD card up to 128 GB in FAT32 format.
- Press ON to start recording. If it will not start, charge for at least 1 hour.
- Check a test recording and the free card space before use.
- Use HDCameraPro and the camera network HW-xxxx to set focus if needed. Hold ON/OFF for 5 seconds to stop local recording.
3. Camera Pro: install the app and start setup
- Install HDCameraPro from the Play Store on Android or App Store on iPhone, then open it and allow the permissions needed for camera connection. Use the app name for this camera version.
- Press ON once. Blue lights first, then green should flash for configuration. If needed, hold the reset button for 5 seconds while on and wait about 15 seconds.
- Charge for at least 1 hour if it will not start. The camera may get warm in use; check actual operation in the app, rather than assuming a dark indicator means it is off.
| Control or state | What it does |
|---|---|
| Blue first, then flashing green | Camera Wi-Fi on; ready for setup/AP mode. |
| Steady green | Phone connected to camera Wi-Fi for setup/AP viewing. |
| Flashing blue and green | Searching for the configured Wi-Fi. |
| Steady blue and green | Configured and connected to internet Wi-Fi. |
| Steady red | Charging; red goes out at completion. |
4. Camera Pro: connect locally and set the focus
- Connect the phone to HW-xxxx in Wi-Fi settings. Choose to keep that connection if the phone reports no internet.
- Open HDCameraPro and select the camera image in AP/Wi-Fi mode. If it is absent, temporarily disable mobile data to force Wi-Fi and reopen the app.
- AP mode is a nearby camera-to-phone connection; the guide lists about 10 metres, not a guaranteed remote-viewing range.
- Open the live view before adjusting the lens.
- Support the camera housing, not the ribbon. Turn the lens clockwise to focus farther away, or anticlockwise to focus nearer. If you turn past focus, turn back.
- Select the speaker icon to hear the camera microphone; unmute and adjust phone volume.
5. Camera Pro: add internet Wi-Fi
- Select + > Equipment AP distribution network > Start connecting > Next.
- If Device not found appears, check the phone is connected to HW-xxxx and that required app permissions are enabled.
- Select Refresh, choose a nearby 2.4 GHz router/hotspot, enter its password, then select Configure Wifi and Sure.
- The camera then stops its own setup Wi-Fi and joins the chosen network. The phone needs to regain internet access through Wi-Fi or mobile data to finish checking the configuration.
- Wait for the timer/main screen. Steady blue and green indicate a successful connection; Configuration failed requires the network checks below.
6. Camera Pro: set the camera password
- On first viewing, enter the new camera password twice. It must be at least 6 characters; select Sure.
- Keep the camera near its configured Wi-Fi. Remote viewing also needs internet on the viewing phone.
- Check Online/live view. Stability depends on both connections; image interruptions can occur.
7. Camera Pro: share access intentionally
- Select Share > Save the QR Code to your phone.
- Share the camera UID/QR and password only with the person who should have access. Keep the camera on.
- That person installs HDCameraPro and grants the needed permissions.
- Select + > Mobile phone scanning QR code, scan from the camera or gallery, enter the password and select Sure.
- Open the camera image to check the shared live view.
8. Camera Pro: recognise the app controls
HDCameraPro lists play/pause, sound, resolution, night-vision mode, full screen, capture/video, gallery, motion alerts, indicator-light toggle, vertical/horizontal flip, battery, connection mode/quality, frames per second, camera name and settings.
The spy-earpiece control belongs to the optional Camera Pro receiver path below.
9. Camera Pro: position the camera without damaging the ribbon
Use compatible fixing pieces for clothing, sleeve or collar mounting. Do not pierce the ribbon when attaching or sewing the camera, and do not leave it hanging from the cable.
Set focus at the intended viewing distance. A remote viewer can use the app’s capture function to take a still image.
10. Camera Pro: finish use, charge or reset
- Hold ON/OFF for at least 3 seconds until the lights go out.
- Use the supplied charging parts or a supply no higher than 5 V / 1 A. Red means charging and goes out when complete; listed charging time is about 2–3 hours.
- The camera can operate while charging, but this is not recommended because it can reduce battery life.
- Reset only when you need to remove the current configuration: while on, hold Reset for 5 seconds, then wait at least 1 minute.
Optional receiver: separate setup
1. Optional receiver: fit the separate cell
- Check that your selected Vip receiver uses a 337/SR416SW cell. MegaMini uses LIR640 and has a separate guide.
- Unscrew the black receiver cap. Fit one cell with the positive, marked side facing up, then refit the cap straight.
- Fit the cell shortly before use. It drains while fitted, even when no audio is playing; remove it after use.
2. Optional receiver: inspect and plan safe removal
Inspect the receiver outside the ear. Background hiss can occur with an induction receiver; it does not prove that playback or calls work. Test the actual audio path.
Keep the sound opening clear. If it is blocked, ask model support about cleaning; do not probe it with a needle or alter the internal spring.
Do not force a receiver deeper. Keep its retrieval thread accessible and stop if fit or removal is not easy.
3. Optional receiver: check two-way app audio
- Keep the white induction element between neck and chest. Moving it nearer increases receiver volume; moving it away reduces it.
- At an appropriate level, secure it without damaging the unit. Keep the camera’s network connection stable.
- In HDCameraPro, press and hold the microphone control (icon 10) while speaking into the phone. Grant microphone permission if requested.
- End any concurrent phone call: it can occupy the phone microphone and block app audio. Test both directions before use.
4. Optional receiver: finish and remove its cell
- End the call or stop playback, then switch off or disconnect the transmitter as described for this model.
- Use an accessible retrieval thread with your fingers only. If removal is difficult, stop repeated attempts and get medical help.
- Once the receiver is safely out, unscrew its cap and remove the cell. Store the receiver and cell separately.
Fix a failed check
No lights or charging appears to fail
Use the supplied parts or no more than 5 V / 1 A, switch off for charging and allow at least 1 hour before testing. The app’s indicator-light control can hide lights while the camera remains on.
If setup cannot be recovered, use the reset procedure for the selected model. Resetting removes its configuration. A unit that will not respond needs model support; do not repeatedly power it during the first charging period.
The camera Wi-Fi network is absent
Check charge and distance from the phone. A camera already configured for internet Wi-Fi normally stops its own setup network.
To start configuration again, switch on, wait at least 10 seconds, hold Reset for at least 5 seconds and allow the documented restart period. This Pro setup path uses flashing green. Follow the Pro reset and restart period above.
A phone hotspot or Wi-Fi is not listed
Use 2.4 GHz Wi-Fi; this is separate from the phone’s 4G/5G mobile service. On an iPhone, check Maximise Compatibility if available; on Android, check the hotspot band/compatibility setting.
Configure the camera from a different phone than the one supplying the hotspot. Check proximity, power-saving/automatic-disconnection settings and whether another device can see the network. Refresh the app’s list.
Internet Wi-Fi configuration fails
Check the selected network/password, charge, distance and 2.4 GHz support. After the camera stops its setup network, the configuring phone must regain internet through Wi-Fi or mobile data.
Restore mobile data if it was disabled for AP setup. A partial setup may require the model’s reset procedure before repeating the same setup path.
Local viewing works but remote viewing does not
A connection to HW-xxxx is AP/local viewing, not proof of remote access. Finish internet Wi-Fi setup and keep the router/hotspot on and near the camera.
Check internet on the viewing phone. Reset/reconfigure only if the current camera network settings need to be replaced.
The image is delayed or unclear
Test the router/hotspot internet connection from another device. If a speed test is around or below 5–10 Mb/s, investigate the network or coverage; this is a troubleshooting clue, not a guaranteed video requirement.
For a smooth but blurred picture, support the camera housing and turn the lens: clockwise focuses farther, anticlockwise nearer. Never hold or twist the ribbon to focus.
The picture is reversed
Use the horizontal/vertical flip controls: icons 12/13 in HDCameraPro. App layouts can change; use the named controls.
Optional receiver audio is low or loud
Check its 337/SR416SW cell, positive-side orientation and straight cap. Test nearer the white induction element at low volume and check network stability.
End a concurrent phone call so the app can use the microphone. Do not bend a receiver spring or use hiss as proof of operation; contact support for a blocked opening or persistent loud noise.
Camera microphone sound is absent
Check phone volume and the app’s sound/speaker control (icon 2). Exit and reopen the app if needed.
The listening controls and microphone troubleshooting specify different on/off states for this icon. If its state is unclear, contact model support rather than assuming that one state works for both directions.
For talk-to-receiver audio, use the separate press-and-hold microphone control and end any concurrent phone call.
Optional receiver removal is difficult
Use the accessible retrieval thread with your fingers only. Stop if it is not easy to remove; do not keep trying with tweezers or other tools. Get medical help for a retained object, and immediate help for a battery in the ear.
Care and safety
Do not push a receiver deeper or put tools or cotton buds into the ear canal. If removal is difficult, stop repeated attempts and get medical help. Severe pain, bleeding or discharge needs urgent care; a battery in the ear needs immediate help.
Mayo Clinic: ear foreign-object guidance · NHS: earwax advice
Keep the device, cables and adapters dry. If they get wet, unplug safely and allow them to dry fully; do not use an external heat source such as a hairdryer or microwave.
Stop using damaged equipment. Use the supplied or specified power parts, keep cables/adapters indoors and do not handle connected equipment during a thunderstorm.
Use is discouraged with a pacemaker, hearing aid, other electronic medical device or a hearing condition. Seek suitable professional advice before use in those circumstances.
Follow local rules for use, privacy and disposal. This product is not a toy. Ask CooMax for the documentation and warranty terms that apply to your selected product and country.
Get model-specific help
Tell us the actual camera version, app, light state and whether local live view works before describing the remote-viewing check. Keep passwords and shared-access codes private.
Choose another model’s instructions
Related parts and setup resources
For optional accessories, check your selected kit and the accessory's model reference before ordering.